We recently moved to a new house, and while there are a lot of things we like about it there’s one small thing that has baffled me. For some reason, the door leading into the house from the garage opens into a short hallway containing a pantry/closet with a door that opens out directly into the path of the door from the garage. As you can imagine this adds an unexpected degree of suspense to the the normally mundane task of getting a box of cereal out of the pantry, never knowing if at any second someone returning through the garage might slam the door into you. After one too many unpleasant surprises I decided to create the Pantry Door Collision Avoidance System (henceforth “PDCAS”) out of a few relatively inexpensive1 pieces of hardware and an only slightly Goldbergian amalgam of software. The goal: place a light next to the garage entrance that will come on when the pantry door is open so that you know to proceed with caution. In the following post I’ll go through how I built the PDCAS.
Hardware
- Zigbee contact sensor - in order to tell if the pantry door is open, we’ll need a sensor. I choose this Ecolink model because it’s cheap and we already had an Echo Show that would act as a hub. As an added bonus it also has a temperature sensor. Not bad for under $15. The downside is that I want to control the light with HomeKit and using the sensor through the Echo Show means I’ll need to use both the Alexa and HomeKit ecosystems2
- Raspberry Pi Zero W - This board will be mounted on the wall near the garage entry door and control a warning light. At $10 with built-in WiFi, these are just fantastic for projects like this.
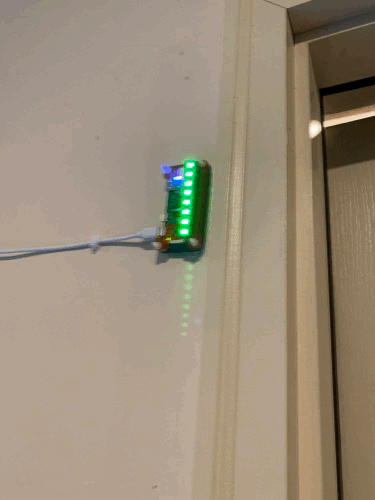
- Blinkt is a strip of individually addressable LED lights that fits perfectly on a Pi Zero.
Software
- Homebridge - Provides HomeKit integrations for just about any kind of device via plugins. I already have an instance of this running on a Raspberry Pi 3 using HOOBS, which bundles Homebridge with a really polished admin GUI. The goal will be to make the Blinkt on the Pi Zero show up as a light that can be controlled by Alexa which we can do with the following 2 plugins.
- homebridge-better-http-rgb - a plugin for Homebridge that shows up as an RGB light in HomeKit and can be configured to call various HTTP endpoints in response to HomeKit requests for the light. It provides a general purpose way to control pretty much anything with HomeKit, as long as you can provide an HTTP api for it to talk to. In this case, I’ll provide an API on the Pi Zero to control the Blinkt.
- homebridge-alexa - The Echo Show Zigbee hub doesn’t provide any direct access to Zigbee devices outside of the Alexa ecosystem so if we want our Blinkt light in Homebridge to be controlled by an Alexa routine it will to show up as device for Alexa as well. Fortunately, that’s exactly what the homebridge-alexa plugin does. You can expose all or some of your HomeKit devices to be available to Alexa as well. The downside is that it depends on an Alexa skill hosted for free by the developer of the plugin. It’s monitored and supported exceptionally well for a free personal project but like any such project it might not be around indefinitely.3
- homebridge-pi-light-server is a service I wrote that implements the API expected by homebridge-better-http-rgb and controls different Pi light boards, like the Unicorn Hat or Blinkt
Overview
Once complete, the overall flow of the system looks like this:
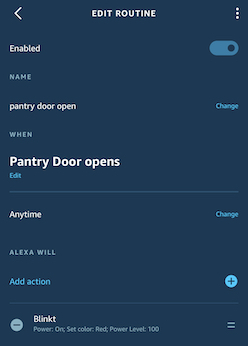
Alexa Routine
Turn on light, set color red]; B --> D[Raspberry Pi 3
Homebridge
homebridge-alexa
homebridge-better-http-rgb]; D --> E[Raspberry Pi Zero W
homebridge-pi-light-server
blinkt turns on];
Setup
- Install the contact sensor on the door and pair with the Echo Show
- Connect the Blinkt to the Raspberry Pi Zero W
- Install homebridge-pi-light-server on the Pi Zero
- Install homebridge-better-http-rgb and homebridge-alexa - With HOOBS this is as simple as clicking a button
Configure homebridge-better-http-rgb
    {
      "accessory": "HTTP-RGB",
      "name": "Blinkt",
      "service": "Light",
      "switch": {
          "status": "http://blinkt-pi.local:8080/api/switch",
          "powerOn": "http://blinkt-pi.local:8080/api/switch/on",
          "powerOff": "http://blinkt-pi.local:8080/api/switch/off"
      },
      "brightness": {
          "status": "http://blinkt-pi.local:8080/api/brightness",
          "url": "http://blinkt-pi.local:8080/api/brightness/%s"
      },
      "color": {
          "status": "http://blinkt-pi.local:8080/api/color",
          "url": "http://blinkt-pi.local:8080/api/color/%s",
          "brightness": false
      }
    }
Configure homebridge-alexa - The full configuration of the plugin is a little more involved and requires the use of a related Alexa skill. Instructions for getting started can be found here. I only want the Blinkt to show up in Alexa since a lot of my other Homebridge devices are available in Alexa by other means, so once everything else is set up I can add the device to an allow list in the config:
"deviceList": ["Blinkt"]Create Alexa routines to turn the Blinkt on and off.
Mount the PDCAS on the wall with some velcro strips and never worry about slamming into the pantry door again.
Footnotes
- Ok, inexpensive assuming you already have an Echo device with an integrated Zigbee hub and a HomeKit hub like an Apple TV. [return]
- Why not make something to run on the Pi and directly expose the light to Alexa? I’ve found that it’s pretty difficult to control local devices with Alexa. Running a skill locally and exposed to the internet is likely possible but deploying skills on AWS Lambda is much easier. However you’d still need to expose something locally for the Lambda skill to talk to the Pi Zero or set up some other communication channel like AWS SQS that both the skill and your Pi can connect to. But now things are getting a little more complicated than I’d hoped. [return]
- What if homebridge-alexa stops working? Well, Alexa routines can also trigger IFTTT actions. An action could call an HTTP endpoint but then we’re back to needing to expose a local service to the internet. An approach I’ve used for other projects is to run the particle-agent on a Raspberry Pi and use the Particle Cloud IFTTT integration to invoke a function through the agent, which can do things like run a script on the Pi. [return]